
Any good decking project starts long before you pick up a saw. The real secret to a stunning, long-lasting deck isn’t in the final board you lay, but in the careful thought and groundwork you do right at the beginning.
It's tempting to jump straight in, but rushing this planning stage is the single biggest mistake I see DIYers make. Taking the time now will genuinely save you from major headaches, unexpected costs, and a lot of wasted time later on.
First things first, where is this deck actually going to live? Wander around your garden and really think about how you'll use the space. Is it a spot for your morning coffee in the sun? Or maybe a shady retreat for entertaining on hot summer evenings?
Pay attention to how the sun moves across your garden during the day. A south-facing garden in Leeds might seem perfect, but you could end up with a deck that’s too hot to use at midday. Also, consider privacy. Stand in your proposed spot and look around. Can your neighbours see everything? It is much easier to incorporate a privacy screen or a few tall planters into your initial design than to try and add them on as an afterthought.
Once you've settled on the perfect location, it's time to get sketching. You don't need fancy architectural software; a simple drawing on graph paper is more than enough to map out the shape and dimensions.
Get outside with some pegs and string to mark out the actual area. This is a brilliant way to get a real feel for the deck's size and to make sure it fits the space just as you imagined. It also helps you visualise how it connects to your house. A seamless transition from your living room, perhaps through a set of modern bifolding doors, can completely transform the flow between your indoor and outdoor living areas.
With a solid plan in hand, you can now work out what you actually need to buy. This is where accuracy is key.
You’ll need to calculate the quantities for:
This is also the right moment to get real about your budget. It can be helpful to look at the costs of similar garden projects to get a sense of the investment. For a useful comparison, check out this guide on the cost to install a paver patio.
Finally, a quick but critical check on the rules. For most UK homeowners, building a deck falls under 'permitted development', meaning you do not need planning permission. However, there are exceptions. If your deck is going to be more than 30cm off the ground or will cover more than 50% of your garden area, you may need to get approval. It's always best to have a quick chat with your local council, whether you're in Harrogate or Newcastle, just to be safe.
You're making a great choice, by the way. The UK's market for composite railing and decking is growing rapidly, showing just how much homeowners across the country, especially in places like Yorkshire, value these low-maintenance, high-impact garden solutions. You're investing in a home improvement that's not only popular but built to last.
Even the most beautiful composite decking is destined to fail if the foundation beneath it is shaky. Your subframe is the unseen hero of the project; it’s the skeleton providing all the strength, stability, and longevity. Honestly, getting this part right is probably the most challenging step of the whole build, but it’s what truly separates a professional-quality deck from an amateur one.
First things first, you need to prep the ground. This means clearing the entire footprint of your planned deck, getting rid of all the turf, weeds, and any large stones. You’ll want to dig down deep enough to pull out the root systems, making sure nothing can grow back and start pushing up against your frame later on.
Once cleared, compact the ground thoroughly and lay down a high-quality weed control membrane. Make sure to overlap the edges by at least 100mm to stop any stubborn weeds from finding a way through. Finally, spread a 50mm layer of gravel over the membrane. This is a crucial step for drainage – it stops water from pooling under your deck, which is a classic cause of premature rot in timber frames.
With the groundwork sorted, you can start building the outer frame. You'll need pressure-treated timber for this, typically C16 or C24 grade. This frame defines the perimeter of your deck.
Cut the timbers to size and join them at the corners to form a solid rectangle or square. Use heavy-duty, exterior-grade screws (at least 100mm long) and put two or three in at each join for maximum strength. Before you fix anything permanently, grab a builder's square to check every corner is a perfect 90-degree angle.
A classic builder’s trick for checking if your frame is square is to measure the diagonals. If the measurement from one corner to its opposite is identical for both diagonals, your frame is bang on. It’s a simple check, but it's non-negotiable for a professional result.
To create a truly bulletproof foundation, it pays to understand the principles of substructure expertise for outdoor living. This knowledge is what ensures your deck will stand the test of time, especially with the damp climate we often get across the UK.
Taking a methodical approach right from the start—choosing your spot, designing the layout, and calculating materials—is the bedrock of a successful project.
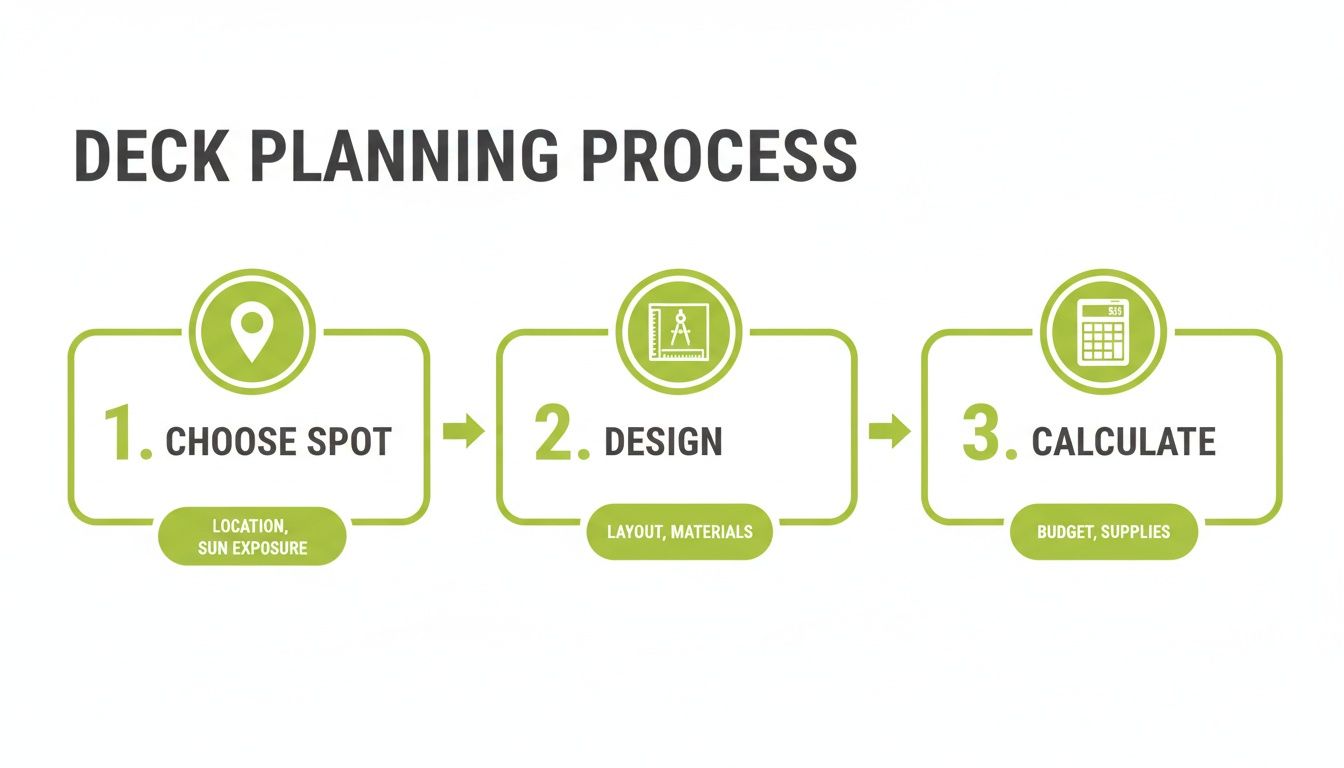
This simple flow shows how proper planning prevents costly mistakes and ensures you have everything you need before you even pick up a saw.
The internal joists are what the decking boards will actually sit on. The spacing here is absolutely critical. If you place them too far apart, you’ll end up with a bouncy, flexible deck that feels unstable underfoot.
For standard residential composite decking, your joists should be spaced at a maximum of 400mm centres. This means the distance from the centre of one joist to the centre of the next should be no more than 400mm. If you're building for a commercial project or an area that will see heavy footfall, it is wise to reduce this to 300mm centres.
You can fix the joists securely to the outer frame using joist hangers. They provide a strong, reliable connection. Just make sure each joist is perfectly level with the outer frame before you fix it in place for good.
Now for a crucial detail: your subframe needs to be perfectly level from side to side, but it must have a slight slope running away from your property. This is all about rainwater run-off. For anyone in rainy cities like Newcastle or Manchester, preventing water from pooling against the house is essential for avoiding damp issues down the line.
The ground you're building on will also affect your choice of supports. For a typical 30m² deck in a place like Hull or Nottingham, where the soil can be quite soft, a site survey would likely recommend 150mm concrete pads to support the joists.
Once you’re happy with the levels and the slope, you can fix the frame to its permanent posts or pads. This subframe is the foundation for everything that comes next. A level and stable base is the key to a flawless finish that you'll be able to enjoy for years to come.
With your solid subframe in place, you’ve hit the most rewarding part of the job—laying the decking boards. This is where your vision for a new garden space really starts to come alive. Before you get carried away, however, there's a crucial first step that separates the pros from the amateurs.
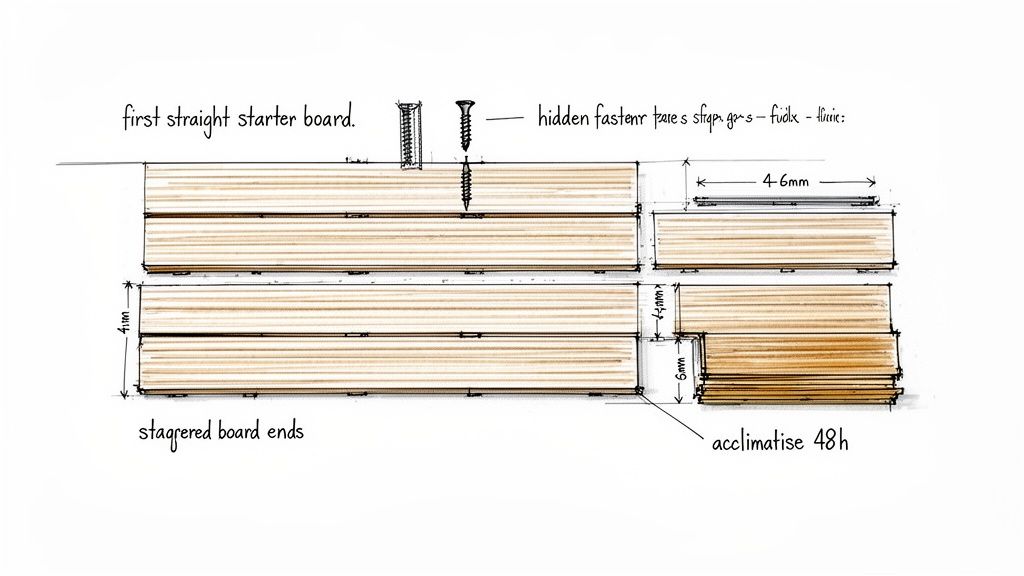
You absolutely must let your composite decking boards acclimatise on-site. Get them out of the packaging and stack them flat on the subframe or on some bearers for at least 48 hours before you even think about fixing them down. This simple action allows the material to adjust to your garden's specific temperature and humidity, preventing frustrating warping or buckling down the line.
How you secure the boards makes a huge difference to the final look of your deck. You've got two main routes to go down.
For most homeowners chasing that premium look, hidden fasteners are the only way to go. They take a bit more time, but the end result is miles better.
That very first board you lay dictates the quality for the entire deck, so getting it dead straight is non-negotiable. This is almost always the board that runs parallel to your house.
Start by placing it in position, making sure to leave a 6-10mm expansion gap against the house wall. Use a long spirit level to check it's perfectly straight. Once you’re happy, fix it down securely. If you're using hidden fasteners, you'll often need special starter clips or have to face-fix this first edge to get a solid starting point.
Take your time with this first board. Measure, check, and check again before you drill a single hole. A wonky first board will throw off every single board that follows, creating uneven gaps that are impossible to hide.
Composite materials expand in the heat and shrink in the cold. It might not be by much, but without the right gaps, your boards will have nowhere to go and could buckle up in the summer. This is why gapping is one of the most important parts of the job.
You're aiming for a consistent gap of 4-6mm between the sides of each board. One of the best things about hidden fastener systems is that they usually create this gap for you automatically. If you're face-fixing, grab a set of decking spacers to ensure every gap is identical. Consistency here is everything.
You also need to leave gaps where boards meet end-to-end. This should typically be around 3-5mm, but always double-check the specific manufacturer’s guide. Even in cooler regions like those needing Glass Balustrades Yorkshire or Glass Balustrades Newcastle, it's tempting to butt boards up tight, but you'll regret it when the first proper heatwave hits.
Unless your deck is very small, you'll have to join boards end-to-end. The trick to making this look professional is to stagger the joints, just like brickwork. The last thing you want is all your joints lining up in a single row—it creates an obvious seam and a structural weak spot.
To do this, start your second row with an off-cut piece from the first. A good rule of thumb is to make sure no two joints on adjacent rows are closer than two joists apart. This staggered pattern not only looks far better, but it also distributes weight more evenly across the subframe, making the entire deck stronger and more rigid. It’s small details like this that make all the difference.
The difference between a good DIY deck and a great one often comes down to the final 5%. It’s all in the small, deliberate details that take a project from a simple platform to a polished, high-end outdoor feature. This professional standard is all about the finishing touches—specifically, how you cut and edge your boards.
These final steps aren't just for looks; they provide crucial protection for the ends of your composite boards and create a safer, neater, and more durable surface. Whether your garden is in York or Hull, taking the time to perfect these details will pay dividends for years to come.
A rough, chipped cut on a composite board is an instant giveaway of an amateur job. The secret to a perfectly clean edge isn't magic—it's using the right tool and the right technique. A mitre saw or a circular saw is your best friend here, but it's the blade you use that truly makes the difference.
For that factory-smooth finish, you need a blade with a high tooth count—think 60-80 teeth. A fine-toothed, carbide-tipped blade will slice cleanly through the composite material rather than tearing at it, preventing those ugly splintered edges.
Pro Tip: The direction of your cut is also vital. When using a circular saw, always cut with the decorative side of the board facing down. For a mitre saw, the decorative side should be facing up. This simple trick ensures any minor chipping happens on the less visible side, leaving your top surface flawless.
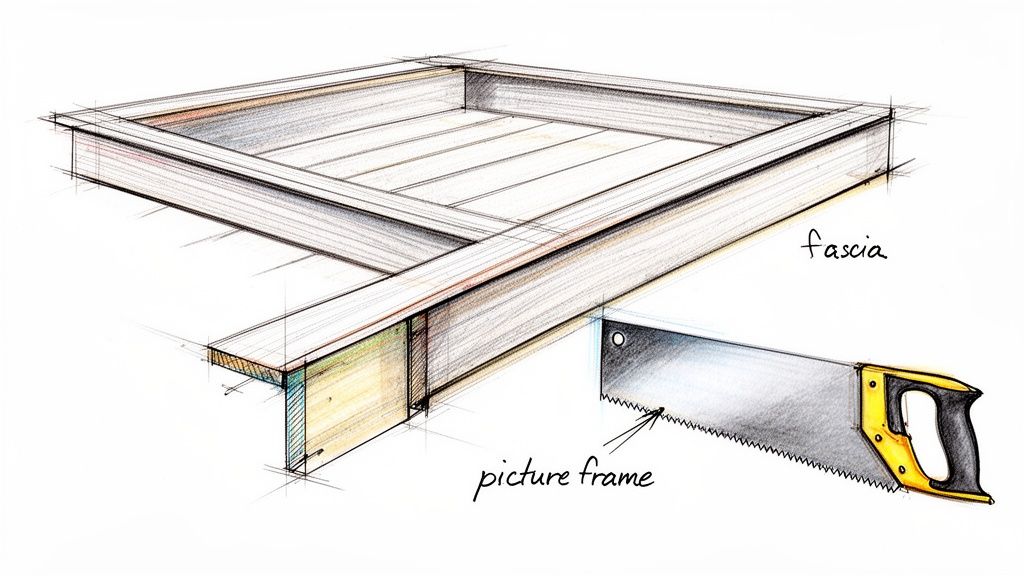
Once your main decking area is laid, you’ll be left with the exposed timber of the subframe and the raw ends of the decking boards around the perimeter. This is where fascia boards come in. These are matching composite boards installed vertically to hide the outer frame, creating a solid, complete look.
Installing fascia boards gives your deck a real sense of substance and weight. It makes it look like a cohesive, intentional structure rather than just boards on a frame. It’s a simple addition that makes a huge visual impact.
For a truly custom, high-end design, consider installing a ‘picture frame’ border. This involves running one or two rows of decking boards around the entire perimeter of your deck, perpendicular to the main boards.
This technique serves several important purposes:
To create a picture frame, you'll need to add extra blocking to your subframe around the edges to properly support the border boards. The mitred corners where the border boards meet require precise 45-degree cuts, so take your time with your mitre saw to get these perfect.
This level of detail is especially effective on larger decks or those with multiple levels. It pairs beautifully with other premium features, and if you're planning on adding a modern railing, you can explore designs for balustrades and balconies that will complement this clean, framed look perfectly. Taking these extra steps ensures your composite decking installation guide leads you to a result that you can be truly proud of, rivalling any professional job from Glass Balustrades Yorkshire to Glass Balustrades Newcastle.
Even with the best of intentions, it’s amazing how quickly a DIY project can go sideways. A first-class composite deck isn't just about following the steps in order; it’s about knowing which classic pitfalls to sidestep before you even pick up a tool.
Drawing from years of experience on site, we’ve seen the same handful of errors trip people up time and time again. By learning from these frequent missteps upfront, you can keep your project running smoothly and end up with a deck you can be proud of for years. Think of this as your troubleshooting guide before the trouble even starts.
The vast majority of decking problems we see start with the subframe. It’s the part you can’t see once the boards are down, but it’s entirely responsible for your deck's stability and longevity. Two mistakes here are particularly common.
First is getting the joist spacing wrong. It’s tempting to stretch the distance between joists to save a bit on timber, but trust me, this is a false economy. Spacing them any wider than the manufacturer’s recommended 400mm centres will create a bouncy, unstable deck that feels flimsy underfoot. Always stick to the guidelines.
The second is completely ignoring drainage. A subframe built dead flat is a recipe for disaster. If you forget to build in a slight slope—around 1cm for every metre is a good rule of thumb—away from your house, rainwater will just pool against your property, which can lead to serious damp issues down the line.
With the frame built, your attention shifts to the boards, and a new set of potential mistakes comes into play. The most critical one is forgetting that composite boards move.
These boards will expand in the summer heat and shrink in the winter cold. If you fail to leave adequate expansion gaps (typically 4-6mm between boards), they’ll have nowhere to go when they expand. This pressure causes them to buckle, warp, or lift, completely ruining the perfect flat surface you worked so hard to achieve.
A classic scenario we see in projects from Glass Balustrades Yorkshire to Glass Balustrades Newcastle is someone installing boards butted up tight in cool weather. When the first warm spell hits, their brand-new deck suddenly develops unsightly waves and bows. Always use spacers to guarantee consistent gaps.
Another frequent issue is improper ground preparation. Just laying your subframe on top of unprepared turf is a massive error. Weeds will inevitably find their way through, and the unstable ground can shift over time, causing your perfectly level deck to sink and warp. Make sure you clear the area, lay down a decent weed membrane, and put down a layer of gravel first.
By being aware of these common slip-ups—bouncy joists, poor drainage, missing gaps, and unprepared ground—you’re already halfway to a flawless finish. A truly successful composite decking installation guide is as much about learning what not to do as what you should.
Even the most careful installer can run into a head-scratcher. Here’s a quick reference table for some of the common issues you might face on the job and how to sort them out.
| Problem | Likely Cause | Solution |
|---|---|---|
| Deck feels "bouncy" or "spongy" underfoot. | Joists are spaced too far apart (e.g., wider than 400mm). | The only real fix is to add more joists ("noggins" or blocking) between the existing ones to strengthen the frame. |
| Water pools on the deck surface after rain. | The subframe was built completely level with no slope for drainage. | A difficult fix post-build. Prevention is key. Ensure a 1:100 fall away from any buildings during the frame construction phase. |
| Deck boards are lifting or "bowing" upwards. | No expansion gaps were left between boards or at the ends where they meet a solid object. | You may need to lift the affected boards, trim a few millimetres off the edge/end, and re-fix them using proper spacers. |
| The gaps between my boards are uneven. | Inconsistent use of spacers during installation. | This is mainly an aesthetic issue. You can either live with it or painstakingly lift and re-space the boards for a uniform look. |
| Screws have "mushroomed" the composite material. | Over-tightening face-fix screws, or not using specialised composite decking screws. | Use a sharp chisel to carefully shave off the raised material. In future, use a drill with a torque setting to avoid over-driving. |
Think of this table as your on-the-job support. Spotting the cause early makes the solution much simpler and less disruptive to your project.
Even with the best guide in hand, there are always a few niggling questions that pop up mid-project. We get it. To make sure you’re completely confident, we’ve put together some quick answers to the most common queries we hear from homeowners. Think of this as the final check before you get started.
For the most part, probably not. In the UK, garden decking is usually considered 'permitted development', which means you can get on with it without needing to file for planning permission.
However, and this is important, there are a few key exceptions. You’ll almost certainly need to contact your local authority if your deck:
Rules can vary slightly from one council to the next, so whether you're building in Yorkshire or Newcastle, a quick phone call to your local planning department is always the smartest first move. It saves a lot of potential headaches down the line.
Getting that perfect, clean edge comes down to one thing: the right blade. For a professional, splinter-free finish, you’ll want to use a circular saw or a mitre saw. The trick is to fit it with a fine-toothed, carbide-tipped blade – something with 60 to 80 teeth is the sweet spot for composite materials.
Here’s a pro tip: to get the cleanest cut on the visible face, always cut with the decorative side facing down if you’re using a circular saw. If you’re using a mitre saw, you’ll want the decorative side facing up. And, of course, always wear safety glasses and a mask – the dust created is very fine.
Good drainage is non-negotiable. It protects your subframe from rot and your house foundations from water damage. The single most important thing you can do is build a gentle slope into your subframe, directing water away from your house. A fall of about 1cm for every metre of deck width is the industry standard.
You also need to leave a consistent gap between each decking board. We recommend 4-6mm to allow rainwater to drain through freely. Finally, make sure the ground underneath is prepared properly with a good quality weed membrane and a layer of gravel to help manage any water run-off and stop it from pooling.
Never be tempted to lay composite boards directly onto an old patio slab. You absolutely must build a timber subframe on top. This creates the vital airflow needed to prevent moisture from getting trapped, which is a fast track to mould and mildew.
Marrying a high-quality subframe with a premium finish like a glass balustrade can create a truly spectacular outdoor space. If you're considering this kind of upgrade, it's worth seeing what's involved by looking at the work of professional glass balustrade installers to understand how to achieve that seamless, high-end look.
Ready to transform your garden with a stunning, low-maintenance deck or a bespoke glass feature? The team at Glass Tech has over 20 years of experience turning visions into reality across Yorkshire and beyond.
A professional team of experts providing glass and glazing solutions covering the whole of Yorkshire & more...
Whether it's Leeds, York, North Yorkshire, Birmingham, Hull, Liverpool, Machester, Newcastle or Nottingham, get in touch to find out how we can help you with your bespoke glass project.